In this article, we will cover how to use JPRO’s Guided Diagnostics and Troubleshooting features. These tools are essential when one or more active faults are present, helping technicians quickly identify and resolve the root cause of the problem. Rather than relying on a manual diagnostic process, JPRO provides a step-by-step approach to guide users through the ideal troubleshooting process.
Related Product
2025 V1 JPRO Professional Heavy Truck Diagnostic Tool JPRO DLA Plus 2.0 Adapter kit
Repair Mentor
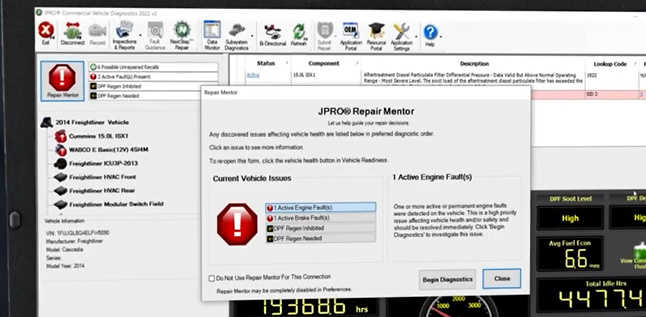
The first feature we will cover is Repair Mentor. This tool automatically appears after JPRO is connected to the vehicle – whenever an active problem is detected. If the pop-up is disabled in the settings, you can still access it by clicking the **Repair Mentor** button in the top left corner.
Repair Mentor is an intelligent diagnostic assistant. It prioritizes detected problems and provides detailed guidance on how to diagnose and resolve them. In our example, it suggests starting with the active engine fault. Click “Start Diagnosis” and JPRO will navigate to the appropriate starting point – usually the “Fault Guide”.
Troubleshooting Guide
The Troubleshooting Guide is the core troubleshooting feature of JPRO. It focuses on providing resources and procedures for resolving fault codes.
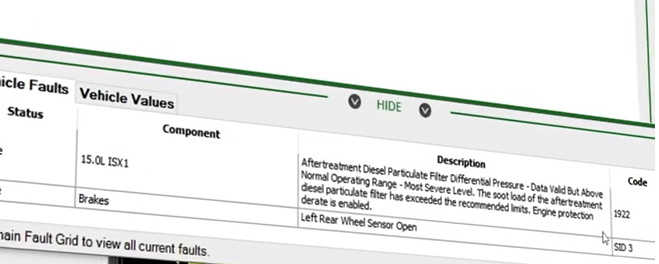
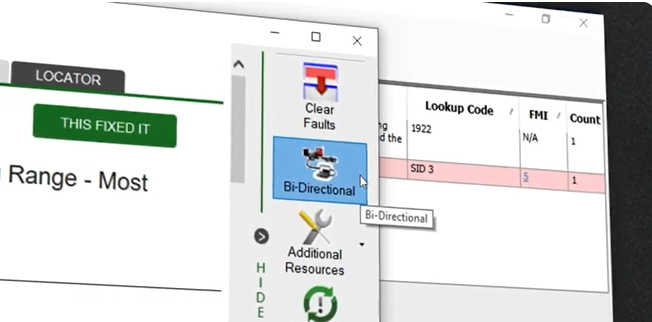
At the bottom of the screen, you will see a list of Trouble Codes, each linked to a specific vehicle system. Depending on the code, you may need to run tests to narrow down the problem. JPRO makes this easy with its built-in Two-Way Tests available directly in the Troubleshooting Guide.
For example, if the fault requires an ACM Reset to enable forced regeneration, you can initiate that test from here. Above this, you will also find a Clear Fault button, which is typically used to delete inactive fault codes at the end of a procedure.
Additional Resources
On the same screen, click the OEM Applications button under Additional Resources to launch any manufacturer-specific software installed on your computer—an option often used by advanced users.
If you encounter an acronym or technical term you are not familiar with, click the Industry Terms button under Additional Resources. This will open a dictionary that explains common industry terms.
Fault Guide Tabs
Across the top of the Fault Guide screen, you will see several “tabs.” These tabs vary depending on the fault selected. Here is a quick overview of what you might find:
– Overview Tab – Provides a detailed summary of the fault and affected systems.
– Wiring Tab – Provides instructions for locating wires, connectors, or components. Use the zoom buttons (+/-) to examine the diagram more closely.
– Troubleshooting Tab – Lists inspection and test procedures. JPRO may prompt you to answer “yes/no” questions to confirm the results. Instructions are very specific — for example:
– Visually inspect connectors for corrosion or cable security.
– Perform electrical tests using the VOLT-ON meter, which displays actual vs. ideal voltage ranges.
After performing all necessary tests and checks, some faults include a final step: Verify Repair. This prompts you to clear the fault and confirm that the problem has been fixed.
Some faults also unlock additional tabs, such as the Locator tab, which provides photos or illustrations to help identify the location of components such as sensors.
Maintenance and Vehicle Data
On the right toolbar, you’ll find the Maintenance/Service Data button. This opens an OE manual that contains information similar to that already in the fault guide. These manuals are typically used by experienced technicians, but since the fault guide consolidates this content, most users don’t need to refer to both.
Finally, you’ll notice two key buttons in the bottom toolbar: Vehicle Faults and Vehicle Values. Vehicle Values displays real-time data points that aid in diagnosis. For example, if the program asks if the resistance between two wires is greater than 50 ohms, you can simply refer to the value on the screen — no manual testing required.
That’s how you use JPRO to guide diagnosis and confidently troubleshoot vehicle issues.