The VNCI PT3G diagnostic scanner is compatible with original PIWIS drivers and software without the need for cracked or patched versions. It serves as a replacement for the original Porsche diagnostic tool PT3G, supporting a wide range of Porsche models from 1996 to the present, including the 9PA, 9YA, 9YB, 92A, 95B, 918, 970, 971, 981, 982, 986, 987, 991, 992, 996, 997, Y1A, and more.
Why Choose VNCI Porsche PT3G?
Compared to the OEM PT3G, custom VAS 615A, and other PT3G tools, the VNCI PT3G offers several advantages:
- Compatibility: Supports original PIWIS drivers, CAN FD/DOIP, multiple versions of PIWIS, and the KW71 protocol (vehicles before the 1995 model year).
- Coverage: Works with Porsche vehicles from 1996 to 2023.
- Ease of Use: Plug and play with free firmware updates.
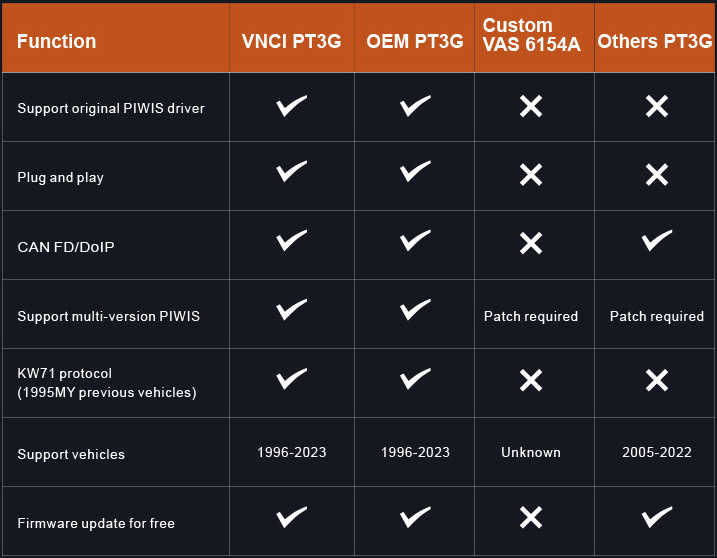
Limitations of Custom VAS 615A and Other Tools:
- Custom VAS 615A: Modifies PIWIS software drivers based on VAS6154A hardware but has incomplete protocol layer communication logic, limiting diagnostic, programming, and immobilizer functions.
- Other Tools: Do not support original PIWIS drivers, KW71 protocol, and often require software patches, making them incompatible with older Porsche vehicles.
How to Install VNCI Porsche PT3G Device Manager and Driver (PUD API)
Step 1: Install VNCI PT3G Device Manager
The Device Manager is essential for updating the VNCI PT3G firmware online.
- Download the VNCI PT3G Firmware Update Tool (Device Manager):
Download VNCI PT3G Device Manager - Install the Device Manager:
Run the VNCI_PT3G_Device_Manager_setup.exe file and follow the installation prompts until complete. - Run VNCI PT3G Device Manager:
- Check the device information, serial number, and firmware version.
- Ensure your firmware and software versions are up to date; if not, upgrade them.
Step 2: Install and Configure the Actia PUD API Driver
If you are using a VNCI PT3G hard drive from obd2.ltd, the VCI driver is pre-configured, and you can proceed with plug and play. However, if you are using original or third-party PIWIS III software, you must configure the VCI in the driver’s PUD API to avoid connection failures.
- Download PIWIS OEM Drivers:
- Copy and Paste the PDU API Folder:
- Extract the ZIP file and locate the XS_D_PDU_API_64 folder.
- Copy this folder and paste it into the PiwisApps/VCI/Actia-64 directory, replacing the existing one.
- Run the 3.4.1 Patch:
- Navigate to the drivers folder and run the 3.4.1 patch. This will establish the connection between the software and the VCI.
- Test the Connection:
- Run the ACTIA_D_PDU_API_Tester.exe program located in PiwisApps/VCI/Actia_64/XS_D_PDU_API_64.
- Select the device module type as PT3G-VCI.
- Verify that the serial number matches the one displayed in the PT3G Device Manager.
- If the serial number matches, click Start to run the software.
Purchase VNCI PT3G Diagnostic Scanner for PIWIS:
For more information or to purchase the VNCI PT3G diagnostic scanner, visit https://www.obd2.ltd/goods-495-VNCI-PT3G-Diagnostic-Scanner.html