These instructions detail the process for cleaning the diesel engine, exhaust system, and cooling system of a CLAAS LEXION 8900-5500 LEXION combine harvester.
Related Contents:
CLAAS CDS 7.5 Diagnostic Software Free Download
CLAAS USB Interface Diagnostic Adapter Package
Note: If you operate in very dry or dusty conditions, you should clean these systems several times a day. Areas with oil or dust buildup may indicate a leak.
Safety Warnings
WARNING: Hot Surfaces – Risk of Burns
- Wait until all components have cooled down before proceeding.
- Open the engine cover and shredding screen only when the components are cool.
- Keep away from hot surfaces and avoid contact.
CAUTION: Cleaning with Pressurized Water or Compressed Air – Risk of Injury
- Cleaning with pressurized water or compressed air can cause swirling dirt particles, which can damage eyes, skin, and airways.
- Wear protective clothing, gloves, safety glasses, face protection, and a mask during cleaning.
- Avoid hazardous areas during cleaning.
Cleaning Instructions
- Switch off and secure the machine.
- Inspect the diesel engine, generator, exhaust system, cooling system, and engine performance for leaks and dirt.
- Have any leaks repaired by a qualified specialist repair shop.
- Remove contamination, preferably using compressed air.
- Prevent dust from entering the generator when using compressed air.
- If compressed air cleaning is insufficient, clean with water and a suitable cleaning agent.
- Clean the inside of the cooling system:
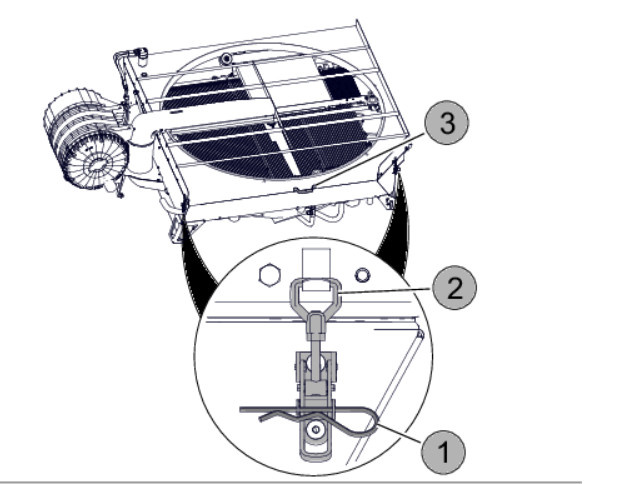
- Remove both spring clips (1).
- Open both locks (2).
- Open the rotating sieve using the handle (3).
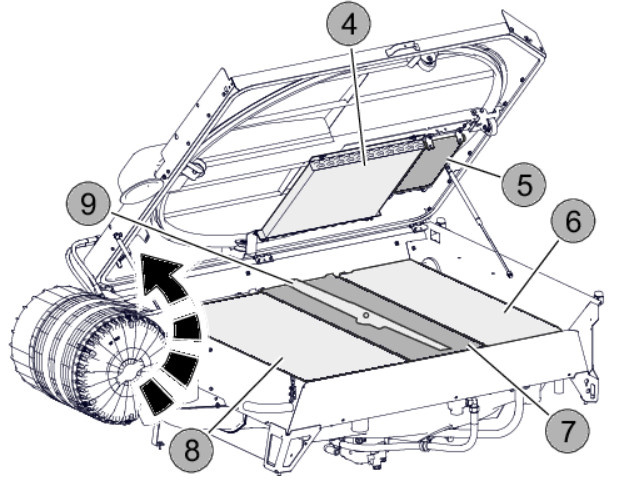
- Clean components (4) to (8) with compressed air.
- Clean the condenser (4) with a maximum pressure of 5 bar.
- Do not damage the slats of components (4) to (8).
- Check if the rotor (9) runs freely; replace the bearings if necessary.
- Close the rotor sheave using the handle (3).
- Close both locks (2) and secure them with the spring clips (1).
Component Descriptions
- 4: Condenser
- 5: Fuel Cooler
- 6: Intercooler
- 7: Oil Cooler
- 8: Water Cooler
For further repair information, refer to the CLAAS troubleshooting guide.