This procedure describes the replacement of the oil separator element, diaphragm testing, and crankcase ventilation for MTU 12V 4000 engines.
Related Content:
- Download of MTU DiaSys 2.74 2.72 engine diagnostic software
- MTU Diagnostic Tool USB-to-CAN (with MTU DiaSys 2.73)
Special Tools, Materials, and Spare Parts:
- MTU 12V 4000 Crankcase Ventilation Oil Separator Element Replacement Instruction
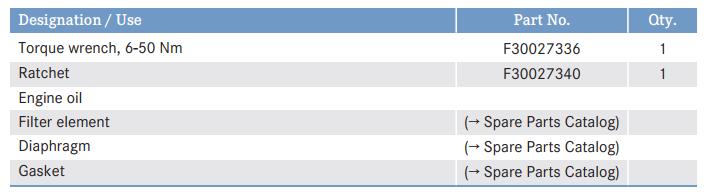
Replacing the Oil Separator Element
- Remove the cover (2) with the O-ring (3).
- Remove the filter element (1) from the housing (4).
- Insert the new filter element into the housing (4).
- Install the cover (2) with a new O-ring.
- Using a torque wrench, tighten the cover screws (2) to the specified torque.

- Replace the other oil separator elements in the same way.
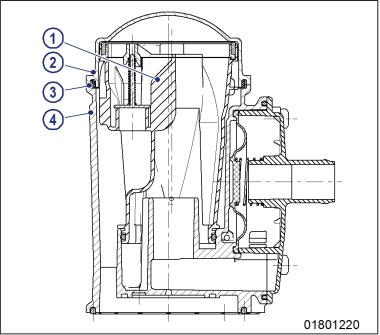
Checking the Diaphragm
- Remove the cover (4).
- Remove the spring (5), seal (2), and diaphragm (3).
- Check the diaphragm (3) for damage and replace it if it is damaged.
- Fit the new diaphragm (3) in the housing (1).
- Install the new seal (2) and spring (5) together with the cover (4).
- Using a torque wrench, tighten the cover screws (4) to the specified torque.

- Check the diaphragm of the other oil separator in a similar way.